Ingrid Sew-Along Day 4
Today you will see Ingrid come together and start to resemble a garment. You will be able to try something on by the end of today’s steps too
Sew Gathering Stitch to Skirts (View A + B only)
Set your machine to a long length basting stitch.
Starting from the notch, back-tack then sew a row of stitching within the seam allowance. Stop at the notch at the opposite end, leaving the thread tails long and loose.
Sew a second row, also within the seam allowance, again stopping and starting at the notches
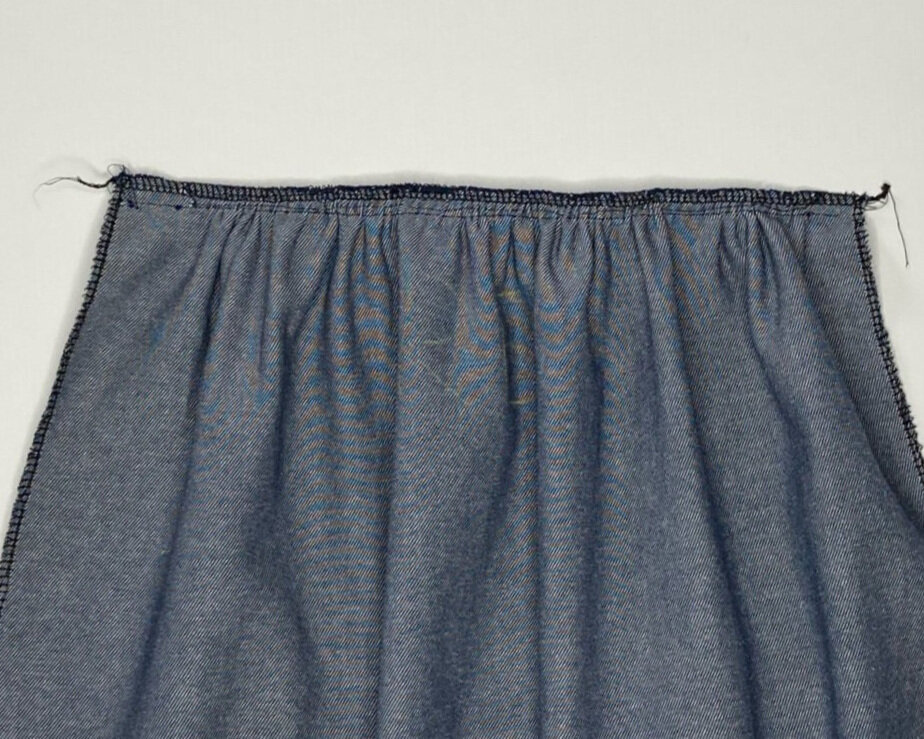
Skirt panel with two rows of basting stitch within the seam allowance
You will notice that your stitch stops 2.5cm (1”) from the centre front panel edges. This is going to help you keep the centre-front and back seams straight when you sew together later.
Pair the skirt back with its bodice before moving on to the next panel
Repeat on the 3 other skirt panels:
Four skirt panels with gathering stitch within the seam allowance and long thread tails
Attach Bodice to Skirt
Right sides together, pin each skirt panel to the corresponding bodice. Using the notches as a guide, pin the panels at each notch only – this will help to make sure your gathers are evenly distributed across the panel.
pair and lay panels right sides together
Pin panels together at notches
(*Note. If you did not label panels or pair bodice to skirt earlier, you can identify each bodice and skirt by its unique notches)
Draw in the tail cords until the skirt widths narrow to match their bodice. Then redistribute gathers between each notch before securing with pins along the waist.
Draw in gathers until the panel widths match
Pin along the waist to secure gathers for sewing
Tie a knot with the two thread tails to secure the gathers and double-check that the centre front edges and side seams match
With the gathered side up, use a 1cm (3/8”) seam allowance to sew the skirt to the bodice. (Before overclocking at the next step, now is a good time to check the panel lengths on your body)
Next, zigzag or overlock bodice and skirt seam together
Stitch the skirt to bodice,
Overlocked seam catching gathers and bodice panel together
Press seam up away from gathers, being careful not to crush them
Gently press the seam allowance up towards the bodice
Make sure not to crush the gathers flat when pressing
Repeat the same process, attaching the bodice and skirts on the other three pairs
Sew Centre Front and Back Seams
Right sides together, pin the right and left fronts together.
Take a moment to check that the bust tuck matches on the right side. Pin the panels along the seam line, then gently flip the top panel to check that the folds of the tucks are aligned on the right side. Add a pin to hold the tucks in place while you sew.
Pin fronts matching tuck, waist notches and neck
Double-check the tucks are aligned at the seam line (not only at the panel edge)
Now match the front neck, waist notches and hem
With a 1cm (3/8”) seam allowance sew the centre front edges together. Make sure the skirt gathers are pushed away from the centre front when sewing
Repeat for the Centre back seam, making sure to sew down from the keyhole notch to the hem
Pin centre-back together
Sew from base of the keyhole to hem
Press seams open - taking care not to crush the gathers at the waist
Insert Pocket Bags and Sew Side Seam
Right sides together, pin the pocket bag to the skirt matching the triangle notches on the pattern
With an 8mm (5/16”) seam allowance, stitch the pocket bag to the side seam, sewing between the pocket notches
Pin pockets using notches for correct position
Sew between notches using 8mm allowance
Fold pocket out and press, before understitching the seam allowance to the pocket mouth
Fold-out pocket and understitch
Repeat for back panels
Right sides together, pin the side seams and pocket. Take care to align the armhole, waist seam, pocket bags and hem
1cm (3/8”) from the edge, sew down from the armhole to the pocket opening first notch. Pivot needle and sew around the pocket bag, stopping at the lower pocket opening notch, pivot needle and sew down to the hem
pin side seam and around pocket
Sew with 1cm allowance
Repeat on second side seam
Snip into seam allowance where the pocket bag joins the side seam
Overlock or zigzag around pocket bags (alternatively, wait and overlock together with armhole seam)
Overlock around the pocket bag
Gently press pockets flat and press side seams open
Sew Shoulders
Right sides together, lay the front panels on top of the back panel, pin shoulders together
1cm (3/8”) from the edge sew the shoulder seams together
Pin shoulders
Sew shoulders with 1cm allowance
Press seams open. You will find that a tailors ham or rolled up towel will be very helpful here
You can now see your Ingrid coming together and try on your work in progress to check proportions
Tomorrow we will add sleeves, facings then hem the cuffs and skirt - see you then x
Shop Ingrid Below:


